Have you been eyeing that sleek, modern single hole kitchen faucet but are intimidated by the thought of replacing your existing 3-hole faucet? Don’t worry, with the correct tools and pro tips, you can do it yourself while avoiding common mistakes. Plus, you can cut your work time in half and complete the task sooner.

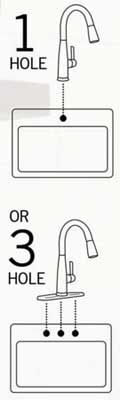
Can You Replace a 3-Hole Faucet with a Single?
Yes, you can! The trick is to use a deck plate cover (which you can easily find for between $10 and $15). In fact, some single hole faucets come with a matching deck plate, or you can shop for them independently.
Alternatively, you can usually cover the extra openings with other sink accessories, depending on their position and proximity to the faucet. For example, some people insert a soap dispenser or disposal button to conceal the openings and make them functional at the same time. See more: 4 Ways to Cover Sink Holes Without a Deck Plate.
Below, I’ve laid out step-by-step guidelines on how to replace a 3-hole kitchen faucet with a single hole faucet. You’ll be having fun washing dishes no time!
Step 1: Get Your Tools & Disconnect the Water Supply
First, grab your tools. You’ll need an adjustable wrench, pliers, plumber’s putty, Teflon tape and your new single hole faucet.

Before starting, turn off the water supply valves located underneath your sink. Then, release any water pressure by turning on your faucet and letting it run empty.
Pro Tip: Before starting your project, clear out any clutter from underneath your sink and lay down a cloth or mat to protect your countertop. (It makes the work easier too.) Plus, this simple step can help prevent damage to your kitchen.
Step 2: Take Out Your Old Kitchen Faucet
Next, detach the hot and cold water supply pipes and the sprayer hose from your existing faucet. Use your wrench to loosen the mounting nuts under the sink, and then lift out the faucet. If the nuts are not budging, hold the faucet stationary with your pliers while you loosen the nuts.
Pro Tip: If you can’t disconnect the old faucet due to stuck bolts and nuts, apply a penetrating oil like WD-40 or Liquid Wrench to relax the nuts. Lightly spray the oil on the nuts (aiming for seems) and allow it to penetrate the threads for about 15-20 minutes. Alternatively, try heat to release the connection with a hair dryer or heat gun.
Step 3: Insert Your New Faucet
Now, clean the area around the mounting holes and allow it to dry thoroughly. Then, apply a small amount of plumber’s putty around the base of your new single hole faucet and insert it into the mounting hole. Secure the faucet by fastening the mounting nuts with your handy wrench.

Pro Tip: Don’t over-tighten plumbing connections because this can damage your sink or cause leaks. Start by hand-tightening bolts or nuts first, and then use tools to achieve a snug connection without using extra force.
Step 4: Attach the Water Lines to Your New Faucet
Finally, attach the hot and cold water supply lines and the sprayer hose to your new faucet, using Teflon tape to create a snug seal on the threaded connections. Turn on the water supply valves and feel around for leaks. If everything looks good, congratulations! You’ve successfully replaced your 3-hole kitchen faucet with a single hole faucet.
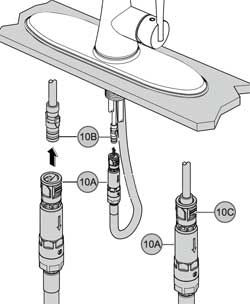
Pro Tip: Some manufacturers like Pfister now include a “Quick Connect” with some of their faucets. As a result, you can snap the connections in place securely rather than tightening them with tools.
Embrace the modern and sleek appeal in your kitchen with the addition of your new single-hole faucet. You’ll relish the sense of accomplishment. Not to mention, you’ll save a considerable amount of money along the way!